Live music for Zoom
- 12 minutes read - 2395 wordsLive music over Zoom can sound terrible for the audience.
- Tinny audio (worse than “on hold” music during a phone call)
- Long notes cut short
- Worst of all, Zoom may silence your performance because it considers it background noise!
Voice slightly distant. Piano notes quiet and cut out early. Low audio fidelity.
It doesn’t have to be this way. Complete the first two sections in less than 10 minutes to noticeably improve your sound.
Continue with later sections if you have the money and time to further improve your sound.
Voice and piano clearer and better balanced. Louder and fuller-sounding overall.
Both audio samples were recorded from the audience-side of a Zoom session.
Performing from your home over Zoom involves compromises, but you can reduce those compromises.
Prepare room (2 minutes, free)
Benefits
- Listeners hear only your music, not background noises.
- Zoom distorts the audio less because it doesn’t need to remove unwanted background noise or perform echo cancellation.
Tasks
- Close doors to reduce noise from other parts of your house.
- Close windows to reduce street and outside noises.
- Turn off fans or other noise makers.
- Plug in headphones.
Zoom settings (5 minutes, free)
Benefits
- Listeners hear notes held for their full length instead of silenced.
- Listeners hear your full range of dynamics (rather than Zoom trying to keep everything at the same volume).
- Listeners hear audio much closer to what your microphone records.
Compare the two audio samples. Both are recorded with the built-in laptop microphone.
Zoom's default settings.
Zoom with "Original sound" turned on.
With default settings Zoom removes background hiss and tries to perform echo cancellation. But for a musical performance, the end result is slightly garbled vocals and long notes cut short (especially in the piano).
Even though the second recording has a lot of background hiss, the overall sound is much closer to the live performance. You can reduce the hiss with better equipment (see “Microphone and audio interface” below).
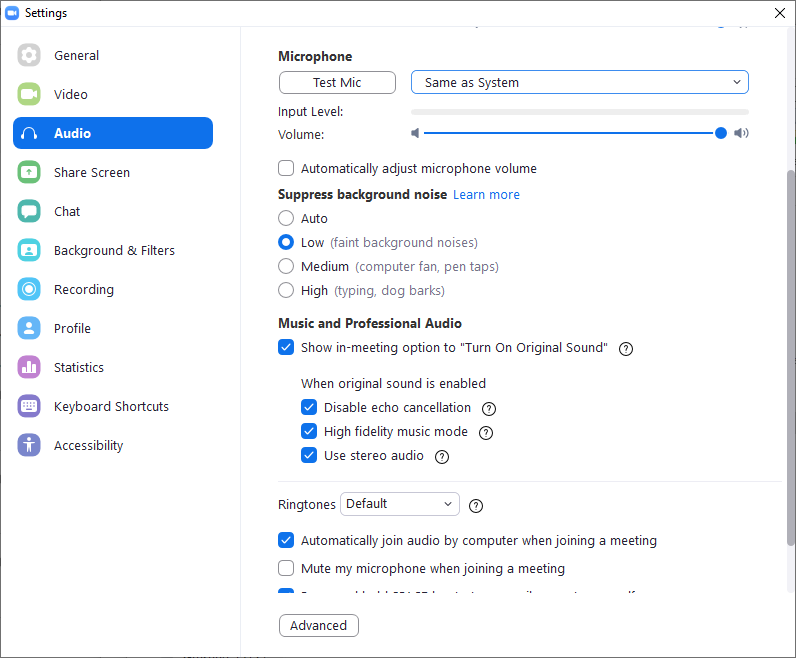
Before the meeting (one-time setup)
- Open Zoom on your desktop computer.
- Choose the gear icon (top right) to open settings.
- In the left pane, choose Audio.
- Uncheck Automatically adjust microphone volume.
- Turn the microphone volume all the way up (you can turn it back down later if you experience clipping/distortion).
- For “Suppress background noise” choose Low.
- Turn on the following:
- Show in-meeting option to “Enable Original Sound” (If you are using an old version of Zoom, look for this under Advanced.)
- Disable echo cancellation (if you can plug in headphones)
- High fidelity music mode (if you have reliable Internet)
- Use stereo audio (if you have reliable Internet and plan on using stereo (see “Audio effects” section below).
At the beginning of the meeting (every time you play music)
- Choose Original Sound.
- Mute everyone except the performing musician.
Practice this step before the live event.
If you are not the meeting host, practice with the meeting host. The host also has a setting “to allow users to select original sound on their end” which must be turned on.1
Microphone and audio interface (1 hour, $300+ for equipment)
Benefits
- Listeners hear a more accurate recording.
- You can place mics in their ideal location for sound (now they are separate from the camera).
- You can place multiple mics (for example, one for instrument and one for voice).
Using external mic and audio interface.
In this sample, the piano is more life-like and better balanced with the voice. The background hiss is no longer noticeable. It is a little quiet. But if needed, you can boost the volume using software (see “Audio effects” below).
Setup instructions
Set up depends on what you are recording.
- Electric keyboard or electric guitar: Use an instrument cable to connect the instrument to the audio interface. You don’t need a microphone. Depending on your electric keyboard, you might be able to plug the keyboard directly into the computer via USB cable and skip the expense of a separate audio interface between the keyboard and computer.
- Acoustic instrument: Mount a microphone on a stand a couple feet away. Connect your microphone to the audio interface. If you are in a room with nice acoustics, experiment with more distance between the instrument and the microphone to capture more of the room sound. If you are in your bedroom, keep the microphone close, so you capture the instrument sound only. (The next section covers reverb and other effects you can add before it goes to Zoom.)
- One or two voices: Mount a microphone one-two feet away. Add a pop filter between you and the microphone (unless your mic has one built in). This cuts down on breath noise, loud pops when you sing words with a “p” or “t” in them, and noisy “s” sounds. For many types of music, clarity of the words is important. but you can experiment with further microphone distances if you are recording in a room with nice acoustics.
- Choir of voices: You need the microphone far enough back that it captures all the voices rather than just one or two, but close enough to clearly hear each word. As a starting point, if the front row of your choir is 10 feet wide, place the microphone 5 feet away (half the distance).
- Combination of voice and electric keyboard/guitar: Plug both the instrument cable and microphone cable into the audio interface. On the audio interface turn on “Direct Monitoring” so that the sound of the instrument gets sent to the headphones (as well as the computer). Plug headphones into the audio interface.
Microphone ($99–$149)
For voice and other instruments a large diaphragm microphone are ideal for recording in controlled environments. They have a low noise-to-signal ratio that works well with less expensive audio interfaces.
- Example: Audio-Technica AT2035 Cardioid Condenser Microphone ($149)
Dynamic microphones are very durable. Go with this option if you plan to travel a lot with the mic.
- Example: The Shure SM58 ($99)—popular vocal mic for live performances
Small diaphragm microphones tend to capture sound most realistically. They are popular for recording instruments and classical music but tend to be pricier.
You can spend plenty more on microphones but consider the larger picture. How often will you use it? Is the difference is sound quality still significant after Zoom compresses your recording, sends it across the Internet, and it plays on the low-quality speakers of most of your audience?
Audio Interface ($159)
The audio interface converts the signal from your mic into a signal it can send to your computer.
- Example: Focusrite Scarlett 2i2 ($159)—two sockets for microphones/instrument cables, plus sockets for headphones and speakers.
Other equipment
- Microphone stand ($25)
- Microphone/instrument cable ($10-20 for a short, balanced cable)
- Pop filter (if your mic doesn’t come with one, and you are recording voice) ($15-20)
- Headphones. Any headphones work. I like on-ear headphones (versus in-ear or over-ear headphones that tend to muffle sounds in the room). That way the natural sound of your voice/instrument blends with sounds from the computer. Wired headphones are ideal, since wireless headphones delay the sound a little.
Audio effects (1 hour, donation)
This section adds complexity to your setup. If you’ve never recorded or edited audio on your computer this section may take longer than an hour to complete.
Benefits
- Add reverb for a more natural sound (rather than the dead acoustic of your bedroom/office)
- Additional volume control (if the knobs on the audio interface aren’t enough)
- Control stereo panning
- Add equalization and dynamic compression to the mix
Using software effects, plus external mic and audio interface.
Install virtual audio device
A virtual audio device lets you send your processed audio over to Zoom. (It shows up as a speaker in your digital audio software and a microphone in Zoom.)
- Download VB-CABLE Virtual Audio Device
- Unzip the folder.
- Right click on VBCABLE-Setup-x64.exe and choose Run as administrator.
- Choose Install Driver.
- Choose Install.
- Restart your computer.
Zoom setup
- Start Zoom.
- Start a meeting.
- Choose the arrow next to the audio icon > Under “Select a Microphone” choose CABLE Output.
Digital audio workstation
I use Ardour (which requires a donation to download), but you can adapt these instructions to any digital audio workstation, such as Reaper, Cubase, Garage Band, Pro Tools, etc.
Start
- Start Ardour.
- Choose New Session > Empty Template > Name the session Live audio for Zoom > Open.
- In the Audio/MIDI Setup window under “Driver,” choose MME (on Windows). Choose the driver that lets you see the virtual “CABLE” as an Output device.
- Under “Output Device” choose CABLE input.
- Choose Start.
Turn on monitoring
- Choose Edit > Preferences.
- In the left pane, choose Monitoring. (In Ardour version 5 or earlier, choose Signal Flow.)
- Under “Record monitoring handled by”, choose Ardour.
- Choose Window > Editor > Show Editor, to return to the main screen.
Prepare tracks
- Choose Track > Add Track, Bus, or VCA.
- From the left pane, choose Audio Tracks.
- Give the track a name that matches what you are recording (e.g. “Voice”).
- Choose Add and Close.
- On the track header choose the red circle to enable recording on that track.
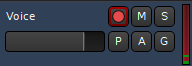
- If you have a second sound input (such as voice and keyboard, repeat steps 1-5).
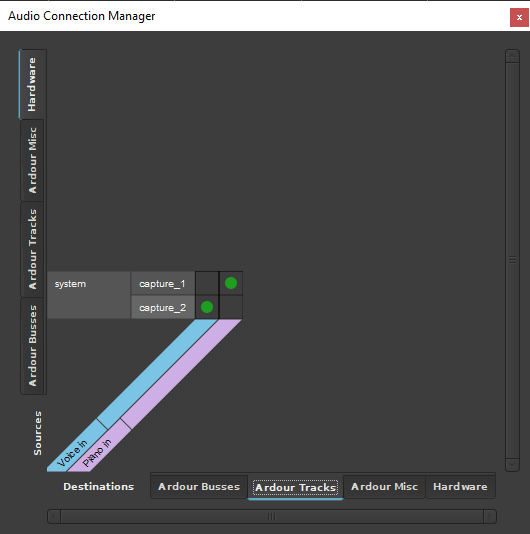
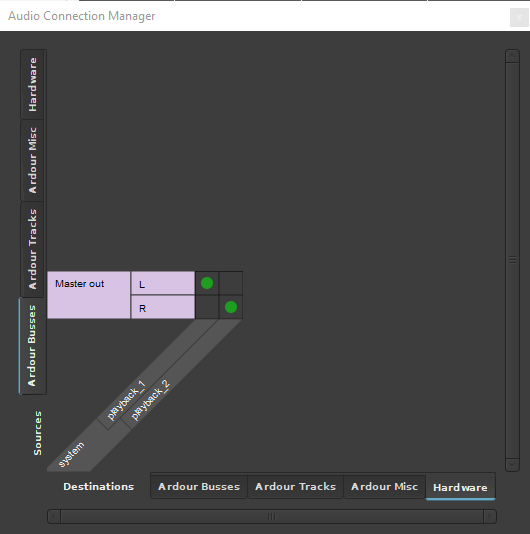
Connect the virtual wires
- Choose Window > Audio Connections.
- Under “Sources,” choose Hardware. Under “Destinations,” choose Ardour Tracks. Add a dot to connect the system capture to the Ardour track. The example below shows “capture_1” connected to the Piano track and “capture-2” connected to the Voice track.
- Under “Sources,” choose Ardour Tracks. Under “Destinations,” choose Ardour Busses. Verify you have dots to connect the tracks to the Master Bus.
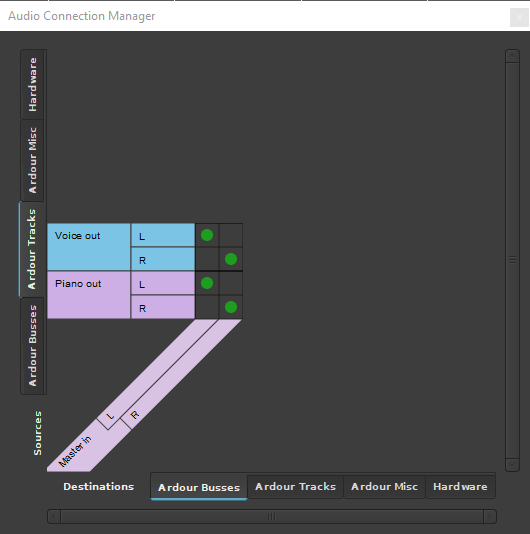
- Under “Sources,” choose Ardour Busses. Under “Destinations,” choose Hardware. Connect the Master out to the system playback.
- Check if you see noise coming into Zoom. Zoom shows a green meter-level inside the microphone icon.
Add effects
You’ve verified that you can get audio to pass through Ardour (or another Digital Audio Workstation) and onto to Zoom. Now you can adjust the audio any way you see fit in Ardour.
Here’s the adjustments I make.
- Temporarily change Output Device to something other than the CABLE so you can hear audio from Ardour. (Choose Window > Audio/MIDI Setup > Stop > change Output Device to your audio interface or computer speakers. Then choose Start.) When switching the sound device you might have to reconnect the audio (see previous section, step 4).
- Record a short practice run. (Choose Transport > Enable Record, then press spacebar to start and stop recording).
- Listen to recording and adjust volume on each track so that you can hear them clearly. Add an amplifier plugin if you need to boost more than the normal volume levels allow.
- If you have a vocal track add an equalizer plugin. For a quick tutorial, see how to equalize vocals.
- Add reverb to the master bus. I like the Dragonfly Room Reverb plugin with the Medium Vocal Room preset. For most situations, a little reverb is better than lots of reverb. The goal is to fill out the sound without drawing attention to itself.
- Add a compressor to the master bus. This increases volume of the quieter parts, without increasing the already-loud-parts past the maximum.
- When you are happy with the mix save the file, and switch the Output Device back to the CABLE input. (Choose Window > Audio/MIDI Setup > Stop > change Output Device to CABLE input. Then choose Start.) When switching the sound device you might have to reconnect the audio (see previous section, step 4).
- As a final check start a Zoom meeting, within Zoom record, end the meeting, then listen to the Zoom recording to verify everything is good.
Congratulations you now have quality audio for your online performances!
Checklist and troubleshooting guide
Just before your big event, you realize the setup does not work! Rather than panic, use the following guide to fix and avoid problems. Adding external microphones and software processing increases the number of ways for the audio setup to break. Using a written, systematic guide each time can reduce last-minute problems and panic. Adapt this guide for your setup.
Every time
- Restart your computer and do not let it go to sleep before the event. My audio interface driver (Focusrite Scarlett 2i2, Windows) is not dependable after sleep.
- Open your saved Ardour session that has mic levels and plugins set. (Creating and using a saved session with tracks and plugins ready to go, saves time and reduces the number of possible mistakes.)
- Verify Ardour outputs to CABLE Input.
- Under Zoom > Audio settings:
- Verify microphone is set to CABLE Output.
- Verify Automatically adjust microphone volume is turned off.
- Verify microphone volume is set to 100 percent.
- In the Zoom meeting, turn on Original sound.
- Do a sound check with someone on the Zoom call.
Troubleshooting
Not getting meter readings/green lights on the audio interface?
- If you are using a condenser mic, check phantom power is on.
- Check connections to computer, and mics/instruments.
- Check volume knobs.
Not getting meter readings in Ardour?
- Make sure tracks are set to record. Turn the record off and on again for each track (this helped once).
- In Ardour Window > Audio connection, verify that the hardware system capture connects to your Ardour tracks.
Not seeing the mic icon in Zoom light up green during sound?
- In Ardour Window > Audio connection, verify that the master bus connects to hardware system playback.
- In Ardour Edit > Preferences > Editor > Monitoring (or Signal Flow on older versions), verify that you set “Monitoring” to ardour (rather than audio hardware).
The audio started out loud but then got quieter as the song when on.
- In Zoom Audio Settings, verify that Automatically adjust microphone volume is turned off and you have the microphone volume set to 100 percent.
Footnotes
-
The host can allow or disallow users from selecting original sound. To turn this on, the host must (1) visit zoom.us (2) choose Sign In (or choose My Account if they are already signed in) (3) choose Settings (left side) (4) scroll down to “In Meeting (Advanced)”, “Allow users to select original sound in their client settings” and toggle it on. ↩︎